Installing OpenWrt on D-Link DSL-G624T
Updated November 20, 2013 – Added paragraph for TcpMaxDataRetransmissions
The D-Link DSL-G624T is a wireless 4-port ADSL modem/router based on the TI AR7 platform. It employs the following hardware:
| Type | Part | Notes |
| CPU | TI TNETD7300AZDW | 150 MHz |
| Flash | Spansion S29AL032D90TFI04 | 4 MB |
| RAM | ESMT M12L128168A | 16 MB SDRAM |
| Switch | Infineon ADM6996M | 4 ports |
| WiFi | TI TNETW1130ZVF | IEEE 802.11 b/g |
We will be installing OpenWrt 10.03.1 Backfire instead of the latest (as of this writing) 12.09 Attitude Adjustment version, since the latter seems to have a bug in controlling the ethernet switch and you end up being unable to connect to the modem. (Note: the terms ‘modem’ and ‘router’ are used interchangeably in this post).
Note for Windows users only: A registry edit and thus a reboot will be required later on (§On Windows), so I suggest you do that first and then come back to this point.
Serial Port
To install OpenWrt we first need to connect to the modem’s serial port and talk to its bootloader (ADAM2 in this case; more info here). To implement this connection you need a USB-to-UART serial converter such as this one.
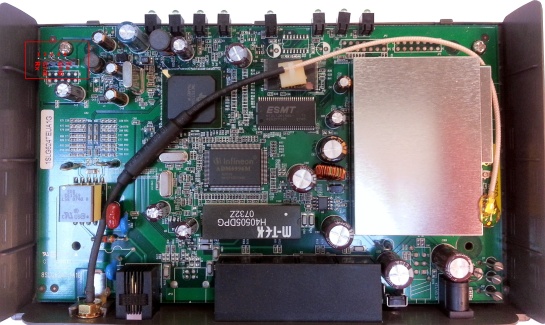
The modem’s serial port is located at the top left side of the board, as shown in the figure below.
Connect the converter to your computer and, with the modem powered off, implement the following connection:
- Converter GND to modem pin 4 or pin 2 (either one will do)
- Converter Rx to modem pin 1
- Converter Tx to modem pin 5
Use only the pins mentioned above. Do not connect the 3.3v line.
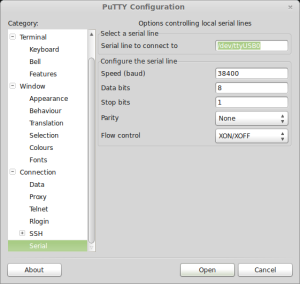
Do not turn on the modem yet. On your computer launch PuTTY or SecureCRT or any other terminal emulator you like (I will be using PuTTY for this post) and, on Ubuntu, point it to /dev/ttyUSB0. (On Windows you need to use the COM port assigned to the converter). Select speed 38400, data bits 8, parity None, stop bits 1 (8N1) and open the connection.
Note: For PuTTY to be able to open /dev/ttyUSB0 you need to run it as root. To do so, open a command terminal and enter gksudo putty & .
Power on the modem now. As soon as the modem is turned on you will see the following output in PuTTY:
ADAM2 Revision 0.22.02_b04_Mar 10 2005
(C) Copyright 1996-2003 Texas Instruments Inc. All Rights Reserved.
(C) Copyright 2003 Telogy Networks, Inc.
Usage: setmfreq [-d] [-s sys_freq, in MHz] [cpu_freq, in MHz]
Memory optimization Complete!

Adam2_AR7RD >
Press any key to abort OS load, or wait 5 seconds for OS to boot...
Press enter to stop the OS from loading and get the bootloader prompt.
MTD Partitions
Once you are at the bootloader prompt you can see all the available commands by typing help. Enter printenv to get an output similar to the following (please note that not all lines are shown; I have included only the lines that interest us):
Adam2_AR7RD > printenv
my_ipaddress  192.168.1.199
mtd0  0x900a1000,0x903f0000
mtd1  0x90010090,0x900a1000
mtd2  0x90000000,0x90010000
mtd3  0x903f0000,0x90400000
mtd4  0x90010000,0x903f0000
Make a note of the mtd values above. Also note the ip address given by the ‘my_ipaddress’ parameter. We will connect to this ip later on.
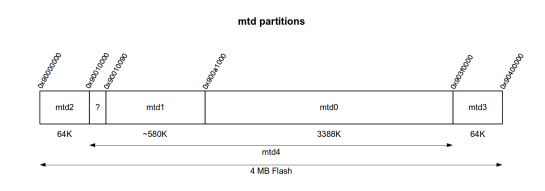
The mtd values given above logically divide the flash memory into different partitions. Each pair of values defines a starting position and an ending position. The figure below helps illustrate this.
This is where the firmware and the bootloader (plus environment variables) are stored.
| Partition | Contents |
| mtd2 | ADAM2 bootloader |
| mtd1 | Kernel |
| mtd0 | filesystem |
| mtd3 | Environment variables |
| mtd4 | mtd1+mtd0 |
Note: Do not edit, modify or in any way alter the contents of partitions mtd2 (the bootloader) and mtd3 (the environment variables) unless you absolutely know what you’re doing. Doing so may render your router unbootable. As long as the bootloader and its settings are intact, you can recover from a bad flash.
Preparing for Installation
We will be installing OpenWrt by overwriting the contents of partitions mtd1 and mtd0 (the original D-Link firmware). According to this device’s page on http://wiki.openwrt.org, we need to slightly modify the partitions’ layout so that it can store the new firmware. Specifically, we need to modify mtd1 and mtd0 so that they have the following values:
mtd0  0x900a1000,0x903f0000
mtd1  0x90010000,0x903f0000
In my case mtd0 already has the required value, so I only need to change mtd1, however I’ll show you how to change both.
To modify the values of mtd1 and mtd0 we issue the setenv command, followed by the parameter we wish to modify and its new values, as shown below:
Adam2_AR7RD > setenv mtd1 0x90010000,0x903f0000
Adam2_AR7RD > setenv mtd0 0x900a1000,0x903f0000
Adam2_AR7RD >
Installation
Now we can proceed to the installation of OpenWrt. Download ‘openwrt-ar7-squashfs.bin’ from http://downloads.openwrt.org/backfire/10.03.1/ar7/ . Once the download is complete, disconnect from the internet and set an ip address in the 192.168.1.x subnet for your computer. Connect to the modem via UTP. Change to the directory where you saved the OpenWrt firmware and open an ftp connection to 192.168.1.199 (this is the ip address the ftp service of ADAM2 is listening to, as given by the ‘my_ipaddress’ variable we saw earlier). Username and password is ‘adam2’.
$ ftp 192.168.1.199
Connected to 192.168.1.199.
220 ADAM2 FTP Server ready.
Name: adam2
331 Password required for adam2.
Password:
230 User adam2 successfully logged in.
Remote system type is UNIX.
ftp>
Issue the following commands to the ftp server:
binaryfor binary file transferhashfor hash mark printing to see the file transfer progress as the firmware is being copied to the modemquote MEDIA FLSHto indicate we want to write to the flash memory
The commands are shown below:
ftp> binary
200 Type set to I.
ftp> hash
Hash mark printing on (1024 bytes/hash mark).
ftp> quote MEDIA FLSH
200 Media set to FLSH.
ftp>
There is one last thing left to do before we begin flashing the modem with the new firmware: we need to take care of TCP retransmission timeouts. On Ubuntu we need to disable F-RTO. On Windows we need to add a dword named ‘TcpMaxDataRetransmissions’ to a registry key. This is crucial; if F-RTO is enabled or if TcpMaxDataRetransmissions is at its default value, the transfer of the firmware will fail.
On Ubuntu
To check whether F-RTO is enabled, do cat /proc/sys/net/ipv4/tcp_frto as shown below. A value of 1 or 2 means F-RTO is enabled; a 0 means it is disabled. If F-RTO is enabled on your system, open a root terminal (sudo won’t work) and issue echo 0 > /proc/sys/net/ipv4/tcp_frto.
# cat /proc/sys/net/ipv4/tcp_frto
2
# echo 0 > /proc/sys/net/ipv4/tcp_frto
On Windows
Run regedit.exe and go to HKLM\SYSTEM\CurrentControlSet\services\Tcpip\Parameters. Add a DWORD named TcpMaxDataRetransmissions and set it to a high value (e.g. 40 decimal). Close regedit and reboot. Do not forget to delete this dword after flashing is complete.
—
Once F-RTO or the Windows registry is taken care of, we are ready to flash the modem with the new firmware. At the ftp prompt issue the following command:
ftp> put openwrt-ar7-squashfs.bin "fw mtd1"
(What the above command says is “store ‘openwrt-ar7-squashfs.bin’ as ‘fw’ into mtd1”. You don’t have to name the destination file ‘fw’. You can name it whatever you like; it doesn’t matter. However you must use mtd1).
You won’t see any output at the ftp prompt immediately. This is normal. If you switch to PuTTY you will see that the flash memory is being erased first. Just be patient.
Adam2_AR7RD > Erasing from 0xb0010000 to 0xb03f0000.
FlashEraseBlock(b0010000,b03effff);
..............................................................
Erase Successful.
Once the erase is completed the transfer will begin. You will get a long series of hash marks at the ftp prompt, indicating the transfer is in progress. You will know when the transfer is complete.
ftp> put openwrt-ar7-squashfs.bin "fw mtd1"
local: openwrt-ar7-squashfs.bin remote: fw mtd1
200 Port command successful.
150 Opening BINARY mode data connection for file transfer.
########################################################

########################################################
226 Transfer complete.
2818052 bytes sent in 37.02 secs (74.3 kB/s)
ftp>
Boot
You’ve now flashed your modem with the OpenWrt firmware. The only thing left to do now is to reboot. At the ftp prompt enter quote REBOOT:
ftp> quote REBOOT
221-Thank you for using the FTP service on ADAM2.
221 Goodbye.
ftp>
and immediately disconnect the UTP cable from the modem as it reboots and runs Backfire for the first time. You can keep the serial connection open and examine the bootlog of OpenWrt as it boots. Don’t forget to remove the ip address you set on your computer manually. Your NIC will be assigned an ip address via DHCP once the modem is booted and you reconnect the UTP cable.
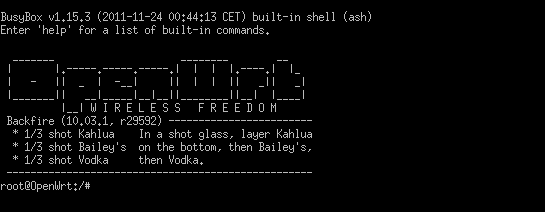
If you press enter from within PuTTY or if you telnet to your modem once it is ready, you will get the following ouput:
Congratulations, you are now running OpenWrt 10.03.1 Backfire. In one of my next posts I’ll walk you through the next steps after first boot. In the meantime, if you wish, you can check http://wiki.openwrt.org/doc/howto/firstlogin .
If you have any questions or if you spotted any errors or omissions, please leave me a comment.


Hi! I tried this firmware but I have problems when I try to enable the wifi. In the serial console I can see this kind of messages:
acx: unknown EID 214 in mgmt frame at offset 28. IE: D6 F9 ……… and other hex values.
Then the web interface gets stuck and I can’t anymore connect to the router. The only thing I can do is flashing again an image so that the wifi interface is disabled by default.
Do you have a working wifi? How can I get rid of this?
LikeLike
I haven’t tried the wifi on this modem – I’ll try it and I’ll let you know.
LikeLike
thank you 🙂
LikeLike
I checked and I have exactly the same problem when I try to enable the wifi. I guess it is a bug – after all, when the acx driver loads you get “acx: master mode (HostAP) is very, very experimental! It might work partially, but better get prepared for nasty surprises at any time“.
By the way, when you get stuck in that loop, you don’t have to reflash the modem. Just reboot and wait until you see this message:
Please be patient, while OpenWrt loads ...- preinit -
Press the [f] key and hit [enter] to enter failsafe mode
Enter failsafe mode, then issue:
mount_rootrm /etc/config/wireless
and reboot.
I’ll investigate further when I get the chance. Perhaps there is an updated version of acx we can use.
LikeLike
great! 🙂 thank you for the tip!
LikeLike