Backing up the Netfaster WLAN 3 firmware
The Netfaster WLAN 3 is an ADSL modem/router provided by greek ISP Hellas Online. Internally the device is identified as AR7505SW11 7-A-LIC and built around the following hardware:
| Type | Part | Notes |
| CPU | Lantiq PSB 50601 HL v1.2 | 133/266 MHz |
| Flash | Macronix (MXIC) MX25L1606E M2 | 2 MB, SPI, 200mil 8-SOP |
| RAM | Winbond W9812G6JH-6 | 16MB @ 166 MHz |
| Switch | Lantiq PSB 6970V v1.3 | |
| WiFi | Atheros AR9271-ALJA |
The admin page of this modem will not give you the option to backup the firmware the device is running (you can only backup your configuration), and you won’t be able to find it anywhere on the internet either, which means that if you accidentally erase or in any way corrupt the firmware, you won’t have a clean, working version to restore. The purpose of this post is to show you how you can get this backup.
Serial Connection
To get the firmware backup we first need to connect to the modem’s serial port. To implement this connection you’ll need a USB-to-UART serial converter such as this one.
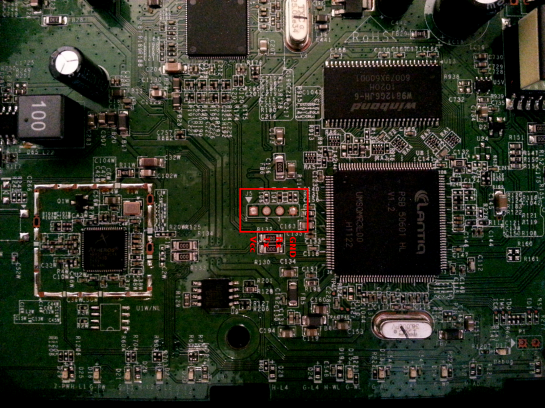
The modem board and the serial port are pictured below. (Note you will need to do a little soldering in order to use the serial port).
Assuming you have the USB-to-UART converter I mentioned above or similar, with the modem powered off, implement a straight connection between converter and serial port:
- Converter GND to modem GND (pin 4)
- Converter Rx to modem Rx (pin 3)
- Converter Tx to modem Tx (pin 2)
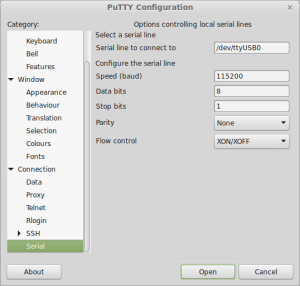
Do not power on the modem yet. Launch your preferred terminal emulator (I’ll be using PuTTY in this post) and point it to the serial line (/dev/ttyUSB0 in my case). Set connection speed 115200, data bits 8, parity None, stop bits 1 (8N1) and open the connection.
Note: For PuTTY to be able to open /dev/ttyUSB0 on Ubuntu you need to run it as root. To do so, open a command terminal and enter gksudo putty & .
With the PuTTY connection opened power on the modem. You will receive the following output:
ROM VER: 1.2.0
CFG 04
EEPROM Data OK

=========================================================================
Wireless ADSL Gateway AMAZON_SE Loader 7505.03 build Sep 20 2010 11:36:23
                      Arcadyan Technology Corporation
=========================================================================
SPI FLASH
RDID: c22015

Copying boot params.....DONE

Press Space Bar 3 times to enter command mode ...
Immediately press spacebar 3 times. This will halt the boot process and take you to the bootloader prompt. At the bootloader prompt press ! to enter administrator mode.
Press Space Bar 3 times to enter command mode ...123
Yes, Enter command mode ...

[AMAZON_SE Boot]:!

Enter Administrator Mode !
Once you enter administrator mode close PuTTY but do not disconnect the modem from the converter. To perform the backup we will use a different program called ‘brntool’. You can download brntool from https://github.com/rvalles/brntool.
Performing the Backup
Before running brntool we need to make a few modifications to its code, so that it is compatible with this modem. Open brntool.py with a text editor and comment-out lines 22-23, 29-31 and 59-60 by inserting a ‘#’ at the beginning of each line. Conversely, uncomment line 58 and, optionally, change the value of bs to 2048 or to any other number you prefer, as long as it is less than 10000 (bs denotes the number of bytes the program will read at a time). In the screenshots below I’ve set bs to 2048.
With the changes detailed above completed, the modem at the administrative bootloader prompt and PuTTY closed, open a command terminal and run brntool by issuing the following command:
$sudo ./brntool.py --read=fw.bin --addr=0x0 --verbose --size=0x200000
If all has gone well you should see a series of dots appear as the firmware is being read. Each ‘.’ represents a successful read of ‘bs’ bytes. A ‘!’ means the read attempt failed, and the program will retry until the read succeeds. When reading is complete, the firmware will be saved as ‘fw.bin’. I recommend you perform a second backup and then compare the two backups to make sure no errors occurred (for example, in my case, the Rx pin had come loose after some point, and I only found out when I performed two successive backups and compared them; the loose Rx pin was distorting the output, so each new backup differed from the previous one).
For your reference I have uploaded my backup to http://1drv.ms/1uYcBn9 .
If you followed the instructions above you should now have a backup of the Netfaster WLAN 3 firmware. In my next post I’ll show you how to restore the firmware to the modem.
If you have any questions or if you spotted any errors or omissions, please leave me a comment.


hi
good work
i have one bricked modem identical to this
can access only the “recovering tool” page
i downloaded your backup and tried to flash with that but i get “error file too big”
can you show how to flash the file back or do i need to modify that file
thx
LikeLike
For restoring the firmware I use a bus pirate to connect directly to the flash chip and then run flashrom. If your modem is the same it should work without modification.
Unfortunately I am not aware of a recovering tool page, so I can’t help you with that. It is possible the recovery page expects the firmware to be compressed/packaged differently than what you get with the method I described.
LikeLike
hi
i have a few questions
“For restoring the firmware I use a bus pirate to connect directly to the flash chip”
you mean that you have desoldered the chip from the board or soldered wires directly to the chip pins ….?
do you think phone cable wuld do the job i have some old samsung cable that have “com port” conector
LikeLike
Hello,
Sorry for the late reply. No, I haven’t desoldered the chip. I considered soldering wires directly to the pins but the space between them is way too small to pull it off. So, to connect to the chip directly, I bought a Pomona 5250 test clip.
I can’t say about the old samsung cable though…
LikeLike
Well, the fw.bin extracted above by the brntool, is actually the whole Flash Image (–size=0x200000) of the device and it is exactly 2MBytes long, that’s why it is too big for the recovering tool to accept it. Instead, it expects the Firmware only (or Code Image), which is max 1600KB long. The exact layout of the Flash is this:
—————————————
Area Address Length
—————————————
[0] Boot 0x00000000 128K
[1] Configuration 0x00020000 128K
[2] Config backup 0x00040000 128K
[3] Code Image 0x00060000 1600K
[4] Boot Params 0x001F0000 64K
[5] Flash Image 0x00000000 2048K
—————————————
With brntool you may extract the Code Image only, providing the correct offset & length as parameters, to get a 1.600KB binary file, which should then be accepted by the “recovering tool”.
If recovering tool, still rejects it, you have another option: Connect with serial console, enter Command Mode (Press Space Bar 3 times), then press ! to enter Administrator Mode, and you will see the full blown menu:
======================
[U] Upload to Flash
[E] Erase Flash
[G] Run Runtime Code
[M] Upload to Memory
[R] Read from Memory
[W] Write to Memory
[T] Memory Test
[Y] Go to Memory
[A] Set MAC Address
[#] Set Serial Number
[V] Set Board Version
[H] Set Options
[P] Print Boot Params
[I] Load ART From TFTP
[1] Set SKU Number
[2] Set PIN Number
[3] Set CountryRegion
======================
[AMAZON_SE Boot]:
Now you can Upload to Flash (press U) the Code Image (press 3), using Xmodem…..
Evan.
LikeLiked by 1 person
Great work there Evan. Thanks a lot!
LikeLike
Pingback: Restoring the Netfaster WLAN 3 firmware | Modemizer
My router thanks you !
LikeLiked by 1 person